Translation mode
Translation mode puts a sheet and its translation side by side, paragraph beside paragraph, so the original is always next to the sentence you're writing. I built it with Hebrew and English in mind, and it works for any two languages.
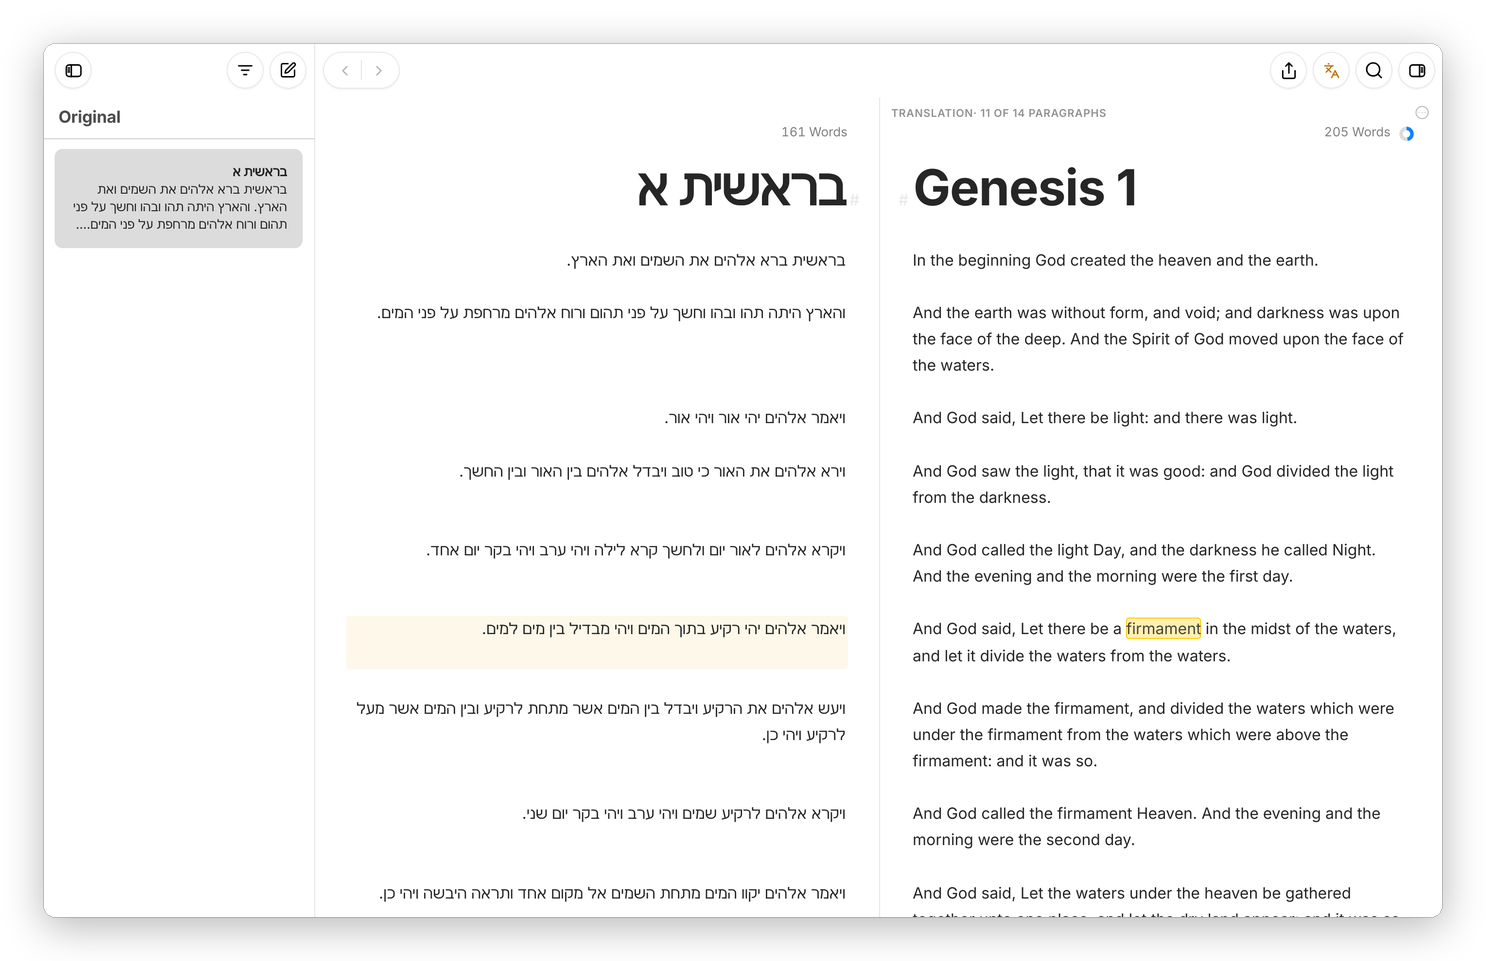 Genesis 1: the Hebrew on the left, the King James on the right, with the paragraph I'm in lit up on the other side.
Setting up a translation
The easiest way is a project from the Translation template: New Project…, type a title, pick Translation and press Done. The project starts with two groups, "Original" and "Translation", and in its Extras a Glossary with a first sheet in it, a group for Queries and one for Notes.
Put the original text in Original, one chapter or section to a sheet, the way you'd split any long text in Moshe. Paste it, or bring it in with Import… (⇧⌘I) if it's a Word file. Then open the first sheet and press ⇧⌘T, or the translation button at the top of the editor, which shows up once a sheet has somewhere to be translated to.
If the translation sheet doesn't exist yet, Moshe makes it in the Translation group with the same file name, a heading mark wherever the original has a heading, and an empty line for each paragraph. From then on you fill it in.
How the two sides pair up
Moshe looks for two groups side by side, in the same project or group, with names that go together: Original and Translation, Source and Target, מקור and תרגום, or Hebrew and English either way round. Capitals don't matter. A sheet's partner is the sheet with the same file name in the other group, or, if there isn't one, the sheet in the same place in the other group's order. Groups inside them pair up the same way, so Original/Part One/Chapter 3.md goes with Translation/Part One/Chapter 3.md.
Hebrew file names are fine: a sheet called פרק ראשון.md on both sides pairs up like any other.
Working side by side
Each paragraph gets room below it to match its partner, so the third paragraph of the original and the third of the translation always start level, however long either one is. The two sides scroll together. When the cursor is in a paragraph, its partner on the other side lights up, which is the quickest way to find your place in a long chapter.
The bar above the second side says which side it is and how many paragraphs are done, like "Translation · 11 of 14 paragraphs", counting a paragraph as done when the translation has text on that line. Its … button has Swap Editors, Arrange Top/Bottom for a narrow window, Dim Second Editor to keep your eyes on one side, and Close Translation Mode. ⌥⌘← and ⌥⌘→ jump between the two sides, and ⇧⌘T closes it.
Since the paragraphs pair up line by line, keep one paragraph per paragraph: when the original has a paragraph you've decided to cut, leave its line empty rather than deleting it, and the rest stay level.
Hebrew
Every paragraph runs in its own direction. Hebrew lines run right to left and English lines left to right, in the editor, in the sheet list and in the exports, without any setting. Hebrew spelling is checked as you type, with Hspell's dictionary, and niqqud is set aside when a word is looked up, so pointed and unpointed text are both fine. English is checked by Harper at the same time. See Writing checks.
For the fonts, Settings › General has Frank Ruehl CLM, David CLM, Noto Serif Hebrew and Noto Sans Hebrew in its list, when the device has them.
Notes, queries and the glossary
A translation collects decisions. The Glossary is the place for terms, and a table works well there, and Queries is the place for the questions for the author or the client, as a sheet each or one long sheet. Inside the text, an annotation on a word (right-click › Annotation) or a %%comment%% keeps the doubt right where it belongs, and Revision Mode (⇧⌘E) lists them all when you go back through a chapter. None of them reach the export.
Sending the translation out
Right-click the Translation group and choose Export…, or select a few of its sheets and press ⇧⌘P. The export takes only those sheets, so the original stays behind, and a Hebrew text comes out right to left. See Export and import.
Basically, instead of two windows and a finger on the line, you have the original and the translation as two plain files that Moshe keeps level for you. If you want to try it, make a project from the Translation template and paste in a page of something you know well.